05 October 2010

03/10/2010

After Yesterdays solid progress, I continued where I left off and decided to have a go at drilling out the rivets, (or very knackered screws as I later found them out to be) from the pedal Box cover. Fluids I think have caused these screws to be 'dissolved away' I used a bit of drilling together with some gentle persuasion from a hammer and a big handled screwdriver, managed to tap out the screw closest to the front bulkhead. the other stayed in its position but the box cover came away. it was necessary to unscrew the cable first from the back of the slave cylinder assembly as this cable runs through the side of the box and sort of keeps it there.

Drilling the first of the screws out.
What I found at this stage was that tapping out the screws from this area washindered by the location of the bonnet catch and the stay behind it, I removed these, and of course both were completely different! the passenger side one was more substantial and had loads of washers attached to it as opposed to driver side that only had 1.
Driver's side Bonnect catch
The camera had run out of juice by now and I had to resort to the phone so I hope the quality is ok!!!
The picture below shows the opposite side Bonnet clip and you can see the difference immediately to the drivers side one!

Washers between the outer part of the clip and the fibreglass (The Voltage regulator for the Dynamo marked 'Lucas' is fairly prominent too). I'm most likely going to use an alternator, so this part will be become redundant.
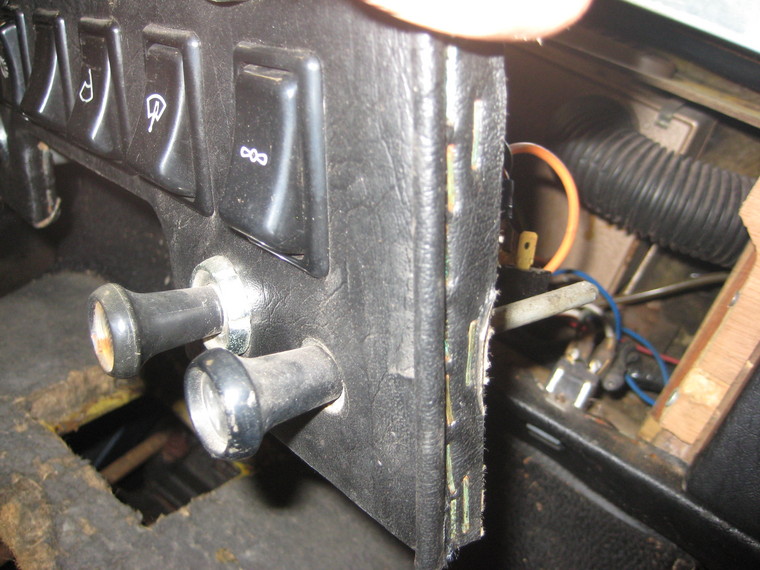
I movedback to the pedal box at this point and took out the plastic surround from around the cyclinders etc. once I had disconnected the cable running from the pedals out to the carburettor.

Pedal Box showing to the right, the Steering rack coming down with an additional clamping mechanism that must be removed to allow the rack to come away from the rest of the mechanism. (Note Dynamo bottom right)
Next up was the Radiator, oil cooler and fan dis-assembly, It was important to remove these parts so that the most amount of space could be gained to work (especially when removing engine and gearbox further down the line).

Looking at the rad there are four bolts, the bottom two were easy to remove, the top two there was only enough room to place a small adjustable spanner moving at one quarter turns each time, the rad had to be pulled forward to allow space for the bolt to work its way backwards sothat it could come off the screw thread.

Here I am removing the oil cooler, this wasnt really much of an obstacle, (even though the screws were rusty) just 4 secure this in total at the base of the unit.
Sowith the removal of the Fan, Radiator and water cooler from the front, the bay looks very sparse now!! there was a small leakage of water at this point (Orange water) this has obviously been in the pipe for some considerable time. and so it went everywhere!


Another view closer up of the front of the car One thing that has impressed me, is how the chassis looks in this incredibly 'exposed to the elements' area! I'm hoping the bits I can't see are at least as good as this. I know the rear sections in the wheel arch area are immaculate.
Another point I can bring up from Yesterdays workings, is the fact there are two flasher units in the car, my dad thinks there is a hazard warning system in place, that I don't think is put as standard on the V6's  or indeed earlier cars?
(See Picture Below).
The main flasher unit is at the very top of the dash fascia, the additional one is cylinder that is on the end of the wires in my hand.
Whilst pottering around the winscreen earlier it was clear that with the removal of the roof, this metal support has been put in place up to the top of the screen so this is a 'bonus' bit of strength for the screen which would otherwise be a major structuralpoint in just fibreglass! 
Anyway this was the end of this weekends work It will be a couple of weekend before I can update but should be able to acomplish much much more in the next set of weekends.

Bye for now!

Weekend 02/10/2010

Plenty to do in the shed so my dad popped up to help with a few things, the first thing was to remove the door, this I tried to do last time but had problems with the three remaining bolts in the top of the panel these have rusted solid, so I fear I may have to grind them off as wd40 and lots of turning didn't acheive success. We removed the door at the hinges and propped up the whole unit.
The next major thing I wanted to look at was the fuel tank it is one of the major elements that must must be removed in order to get the Body off, We were able to pull out the filler cap and disconnect the connecting pipe and hose, but as for taking the whole tank out, this needs access from underneath the car which at this time I can't do as I haven't yet purchased any axle stands so that I can get to the bolts underneath.


Here, the filler cap can be removed from the top and once the jubilee clips are loosened the hose can be removed through the hole in the bodywork. The resulting appearance is like so...
The rubber ring seals shown round the aperture here have degraded and will need to be replaced, it's best to keep the originals so that new alternatives can be found to match.

The next part we looked at was the Windscreen, now this was a lot easier than I had thought! as once the strips around the glass were removed, the window came out fairly freely. Again, important to keep the screen, even if you don't use it again, you have it as a blueprint as well as the sealing surround sand the silver strips that pull out of the groove between the glass and the seal.

Dad starts to remove the seals for the window and then lifts (after I've finished documenting it on camera!)

I remove the passenger side vertical strip


Screen now fully removed from the car.


A closer look at the edge of the window showing the roof was cut fairly cleanly from hereand would need a 2/3mm of filled fibreglass to make up the dpeth of the saw blade here if the roof is re-attached.

As we were in the area now of the steering column, I asked what was needed to remove the rack so that the remainder of the dash and instruments could be removed as well as the body being allowed to come off. the next few images show what must be taken off.

1st screw into the column needs to be removed, there is a bolt through the centre of the wheel that needs to be taken out also
There is a bolt on both of these stalks that have to be removed.
The two bolts on this clamp ned to be removed so that the clamp doesnt do its job of holding the column in place
More bolts here that have to be undone
Where there is a large concentration of blue wire, there is a gnurled nut in here that has to be removed carefully! as if this is lost, it will be a nightmare trying to find another! this holds the instrumentation in position and also allows disconnection of wires.
Once I was taken along the length of the column we disconnected the wipers and the stalks they are connected to, this will only come out once the wiper assembly is unbolted from the front bulkhead, these screws can be accessed (in the below piccy) through the dashboard, and the second picture from inside the engine bay.
Here the mounting bracket is clearly visible under the arm with bolts at either end
The two Main bolts for undoing the wiper motor are from the centre to the left of the image (to the left of the fuse box once these are undon the wiper motor also once disconnected from cables will come out.
Dad left me to my own devices at this point and I continued to work on a few other things around and about the car first of which was the glut of hoses that connect the radiator to the engine and the oil cooler to the engine. Here I am undoing the jubilee clips that fasten at each end of the pipe.

Image shows the very front mounted rad and the ends of the two hoses to the oil cooler the fan as it is setup at the moment, the plan is to get hold of a rad with a built in fan. mounted on the unit itself as opposed to a seperate system on a framework
Disconnection of water pipe to the radiator, jubilee clips on either end connect this up firmly, these have to be removed.
as you look at the front of the car, there is this device (Fuel pressure regulator), the horn controller, and currently a washer pump, I remove all these items at this stage.
Washer bottle bracket, this will need to be removed and then sited elsewhere once the new rad layout is in place
With light starting to fade a little, I stopped here and went indoors for Saturday. A lot of extraneous components have been removed at this point, the horn control unit, (Blue topped cylinder on the left) is still attached and so here are the horn trumpets behind the rad.

22 September 2010

18-09-2010

I felt like I went at the car like a bull in a china shop today!!! started to strip loads more components, many thanks to my step dad who was able to assist me in removing the drivers door and pointed out where the retaining bolts for the window motors were! still hampered by three bolts along the top of the passenger door which for some strange reason, although covered by a panel and being inside the car have rusted together!! making it difficult to remove! I managed to remove the boot lid carefully by myself. I cant get the hinge off at the moment as this is rivetted in i'll leave that until I have some assistance (someone who knows what they are doing! basically!)


Boot Hinge, looks a tad rusty on the rear bulkhead rivets look in bad shape too.
I look now at the Doors and have taken a series of photos that will help me in putting the motors back together. On this car the electrics and door retaining straps (stops the door swing back on the front wing of the car) all run into the cabin and through the same holes, its been said these can break and so a good modification is to run the electrical cabling through a hose in the door then going into the bodywork to the dashboard switches.
Showing the cabling run to the door, door rubbers also visible.
This is actually taken after the motor was pulled away but clearly shows where the electrical run goes to.
Motor in situ before I removed it.
The bolts and mounting plate for the door assembly, (connects to the hinge).
The dor bolts go through this section here (Im holding the door up at this point!)
The Chrome Window frame removed from the door, Note: the teo holes in one of the vertical bars where later style mirrors were placed. These frames will  need refurbing as (they are rare first and foremost) and the tarnishing and speckling of the finsh has already started to set in. The mirror holes can be filled and re chromed im told.
The door minus all internal features, you can see the two black taped over holes that would have contained the original mirror mountings I will probably use either a torpedo mirror or a stick mounted mirror (original Mini type parts)
With these parts of the body removed I have moved to the front of the car where I have started removing more parts. the front fibreglass wheel arch/covers

Removing the internal wheel arch (Pedal cylinder box caused some problems here) as I couldn't move this due to the outside rivets being totally obliterated by the fluids used previously the rivet heads literally 'rubbed off' and turned to powder! 
More of the engine bay visible, starting to look more sparse here now!
Fuel pump, (mine was attached to the passenger side wheel arch cover I have re-attached the hlding bolts to it so that these dont go missing! This will probably be located in the boot when the car is put back together.
Another overview of the engine area.
Showing the door removed
At this point I packed up, satisfied I had acheived a fair whack this weekend more next weekend.

21 September 2010

30-08-2010

Set to with removing a lot more of the exterior features today , The rear lights, the Head lights and getting to grips with some of the reams of cabling that are running to the rear of the car.
I must admit to a bit of frustration with the screws holding things on! they are obviously original as most of them have firmly rusted into place! one screw snapped when I turned it so that's one less holding the rear light on!!
I have also managed to remove the rear boot catch inside the car, the chrome one and light unit on the outside just dont want to move!! so I'll remove these later when I have further help. Having now taken off the rear light fittings It is apparent that this car was Yellow at some point!!

The wire mess! I have pulled the plugs out from the back and unscrewed the unit from the front.
Glass covers off revealing the bulbs, the unit is unscrewed from the 4 corners

Rear showing both sets of lights removed, fuel tank visible, this is in good nick too, just needs tidying up with a paint finish/powdercoat etc.
Inside the bootspace where the rear lights were (this is the Near side rear one)
Rear Boot catch (now removed)
Cabling run to the rear of the car (looking frontwards towards the seats)
With this done and my failure to remove the rear bumpers, (the bolts are rusted solid!) I turned my attention to a few other things.
I decided to unscrew this panel and drop down just to see what I was up against!
I unscrewed the centre dash fascia and had a look inside great to see a good condition heater unit but what I did notice was that the two pull knobs for heater and choke (labelled) were actually decorative! there was no wiring going to them! probably can get away with removing them altogether as My dads V6 doesn't have a choke pull at all and I think other owners have done away with them too.
Decorative choke and heater pull switches
This will be my last bit of work for a couple of weeks, as I'm off on the Luxembourg 2010 rally. G.