22 September 2010

18-09-2010

I felt like I went at the car like a bull in a china shop today!!! started to strip loads more components, many thanks to my step dad who was able to assist me in removing the drivers door and pointed out where the retaining bolts for the window motors were! still hampered by three bolts along the top of the passenger door which for some strange reason, although covered by a panel and being inside the car have rusted together!! making it difficult to remove! I managed to remove the boot lid carefully by myself. I cant get the hinge off at the moment as this is rivetted in i'll leave that until I have some assistance (someone who knows what they are doing! basically!)


Boot Hinge, looks a tad rusty on the rear bulkhead rivets look in bad shape too.
I look now at the Doors and have taken a series of photos that will help me in putting the motors back together. On this car the electrics and door retaining straps (stops the door swing back on the front wing of the car) all run into the cabin and through the same holes, its been said these can break and so a good modification is to run the electrical cabling through a hose in the door then going into the bodywork to the dashboard switches.
Showing the cabling run to the door, door rubbers also visible.
This is actually taken after the motor was pulled away but clearly shows where the electrical run goes to.
Motor in situ before I removed it.
The bolts and mounting plate for the door assembly, (connects to the hinge).
The dor bolts go through this section here (Im holding the door up at this point!)
The Chrome Window frame removed from the door, Note: the teo holes in one of the vertical bars where later style mirrors were placed. These frames will  need refurbing as (they are rare first and foremost) and the tarnishing and speckling of the finsh has already started to set in. The mirror holes can be filled and re chromed im told.
The door minus all internal features, you can see the two black taped over holes that would have contained the original mirror mountings I will probably use either a torpedo mirror or a stick mounted mirror (original Mini type parts)
With these parts of the body removed I have moved to the front of the car where I have started removing more parts. the front fibreglass wheel arch/covers

Removing the internal wheel arch (Pedal cylinder box caused some problems here) as I couldn't move this due to the outside rivets being totally obliterated by the fluids used previously the rivet heads literally 'rubbed off' and turned to powder! 
More of the engine bay visible, starting to look more sparse here now!
Fuel pump, (mine was attached to the passenger side wheel arch cover I have re-attached the hlding bolts to it so that these dont go missing! This will probably be located in the boot when the car is put back together.
Another overview of the engine area.
Showing the door removed
At this point I packed up, satisfied I had acheived a fair whack this weekend more next weekend.

21 September 2010

30-08-2010

Set to with removing a lot more of the exterior features today , The rear lights, the Head lights and getting to grips with some of the reams of cabling that are running to the rear of the car.
I must admit to a bit of frustration with the screws holding things on! they are obviously original as most of them have firmly rusted into place! one screw snapped when I turned it so that's one less holding the rear light on!!
I have also managed to remove the rear boot catch inside the car, the chrome one and light unit on the outside just dont want to move!! so I'll remove these later when I have further help. Having now taken off the rear light fittings It is apparent that this car was Yellow at some point!!

The wire mess! I have pulled the plugs out from the back and unscrewed the unit from the front.
Glass covers off revealing the bulbs, the unit is unscrewed from the 4 corners

Rear showing both sets of lights removed, fuel tank visible, this is in good nick too, just needs tidying up with a paint finish/powdercoat etc.
Inside the bootspace where the rear lights were (this is the Near side rear one)
Rear Boot catch (now removed)
Cabling run to the rear of the car (looking frontwards towards the seats)
With this done and my failure to remove the rear bumpers, (the bolts are rusted solid!) I turned my attention to a few other things.
I decided to unscrew this panel and drop down just to see what I was up against!
I unscrewed the centre dash fascia and had a look inside great to see a good condition heater unit but what I did notice was that the two pull knobs for heater and choke (labelled) were actually decorative! there was no wiring going to them! probably can get away with removing them altogether as My dads V6 doesn't have a choke pull at all and I think other owners have done away with them too.
Decorative choke and heater pull switches
This will be my last bit of work for a couple of weeks, as I'm off on the Luxembourg 2010 rally. G.

Major structural feature removal. 22-08-10

I managed to get some help from my dad this weekend to remove the Rollbar, I really dont like it and frankly as I'm going to restore it to a coupe it is simply too high to accommodate.
Once the main safety harness bolts were removed, the main holding bolts for the roll bar could be removed. We also set about removing all the poppers from what would have been the rear window surround where the improvised permanent canopy was placed. I was quite worried at this point as the two rear most bolts connected to the chassis rail under the parcel shelf were un-done and a steady stream of water  ran out onto the rear tyres I'm really nervous now about what i'm going to find in that chassis rail when the Body comes off! The rest of the chassis is pretty immaculate.

Harness bolts on parcel shelf, and remainder of roll bar bolts being removed note the poppers around the rear of the car the circular holes are where speakers would normally be mounted within the wire in the centre would normally be connected to the centre interior light (This car didnt have one fitted) but I will fit a unit when I acquire the parts


Roll bar out, dad removes the poppers along the edge of the bodywork.


Next to make future work more straightforward, we disconnected the headlamps and indicators and removed the Bonnet it is clear the plywood bracket built into the end of the bonnet (where the hinges meet) has been damaged or rotted and would need to be chopped out and replaced I will include a photo of this once work starts here depending on how I wish to proceed with the bodywork. I may repair this shell extensively or for the time being, acquire another shell I know of.

Front end now visible with the bonnet removed.

As the bonnet has now been removed, I can remove the light fitting (also like gold dust to get hold of) and get them refurbed.
I have found out that the Carburettor here is an earlier 40 DFAV unit which I read on various sources is good to change for a later DGAS/DCNF setup one to ponder I think.
Also clear that the front Chassis rail still has old bits welded to it that may have held other things and does look untidy so may need to cut this section out and replace with a tidy new section.
I have packed the interior off to store elsewhere in a secure environment to stop damage from pests/elements etc.


As you can see, both sides look in fairly good condition just a strip down and shotblast re-coating of these bits will suffice with brand new springs and shocks to be fitted as these are leaky and a tad bouncy to say the least!

 Looking at the very front end, this arrangement is odd to me as most V6's I have seen have the rad mounted within the square engine bay section (Me being somewhat of a minimalist) I will probably go back to this arrangement (It seems to work) and weld brackets onto the front rail facing rearward toward the engine. see an example below....


That's all for this weekend!

Getting started Properly!! 15-08-2010

1st major weekend in the Shed, Some more good progress this weekend, Interior (apart from the main dash board front panel) is out.
Further inspection in the engine bay shows that the wiring has been chopped and changed around a fair bit I dont want the situation of any dodgy connections this is a concern. The rather heath robinson looking hood  revealed a mouse nest underneath which meant the carpet the nest was on was eaten through, mask and gloves on for that!! 
The passenger side chrome door handle (inside the car) had a half snapped flange on it so that will need replacement when I get to an autojumble! I can't believe that this car appears to have only done just over 8000 Miles im guessing from new?

Door showing removed panels and internal fittings I've got to tackle the wiring and frames from here.
Most of the interior carpet lining removed here
  That's all I've had time to do for this weekend more updates to follow.

Acquisition of a long held dream!

Welcome to my Blog about my ambitious restoration project of a classic 1970 Marcos 3.0V6 I hope you enjoy reading and find some technically useful information here as I know lots of owners embark on such projects also. 
Ok, Back on August 8th after a few weeks of negotiation, and with lots of assistance from some fellow Marcos friends, I picked up a Marcos 3.0 V6 which would need some restoration to bring it to how I have always wanted mine to look! This car is fitted with the Ford 'Essex' engine, mainly fitted to the Capri, Zodiac, and Zephyr, to name but a few.
These cars were originally Coupe's but this one has a major modification where the roof was removed (Ihave also got this which is remarkable so I will most likely re-attach this t the car using a good fibreglass specialist. 

About 10 years ago when someone first asked me if I would ever consider restoring one I said, 'NEVER!'' the idea of Restoring one would have been too daunting a task to me both financially and from a mechanical/knowledge point of view.

Over the last decade, I have assisted in many technical situations with other Marcos cars, (Mainly owned by both my step father's V8 and my fathers 1971 V6). So I changed heart a little, given how many close relatives and the increasing number of Marcos friends I now have to assist with technical advice.
Being fairly obsessed with Marcos from the age of 8 I have come to know my way around one! so here are some of the first pictures.


The car doesn't have all of the necessary parts in place to run under its own power (Battery/fluids etc) so we push this on to a trailer equipped with a winching mechanism.
 At this point, the car still as its old personalised plate on it, I have the original period plate details so once the car is roadworthy again, I will have one made up in the style it would have been in during 1970
 The last photo shows that before I closed the building down, I had to remove the interior and racing harnesses as these were fairly new, I didn't want them getting destroyed by the elements or any rodents that may be lurking in the building.


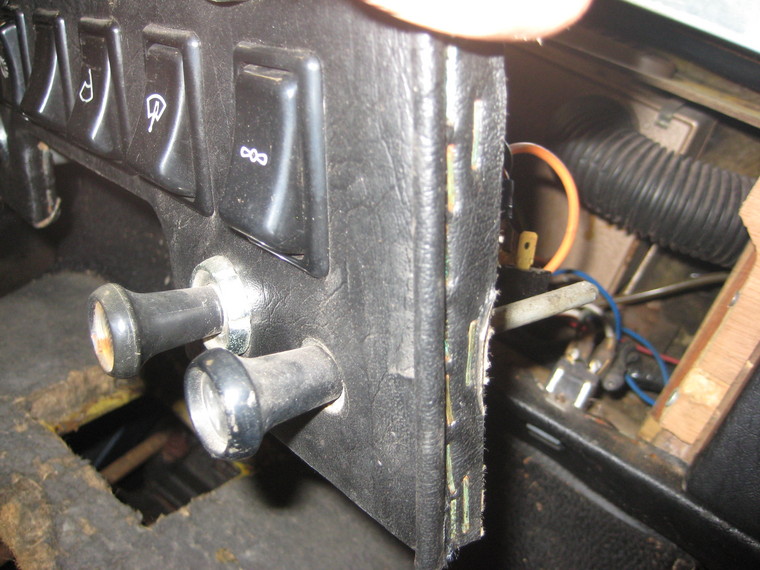
The Grey leather dashboard hood with a nice edge stitching detail will be removed here, the front fascia isn't needed to be removed at this stage, as I will be getting a wood veneer dash fabricated in its place. walnut or similar?
The rocker switches are in excellent condition which is vital as these exact items are hard to come by, the Smiths instrumentation too are in good condition, all be it for a bit of cleaning and a couple of new bezels will be required to make them all as good as new.