18 October 2022

Interior fit out and external post spray preparation

 So in this post I'm going to go through in brief the series of stages that occurred after the car was delivered back to Redline Sportscars. 

Firstly was the joining together of all the panels which arrived back seperately from Ross' spray shop. (Cornelius restorations @Bodyshop Accident repair Melksham).

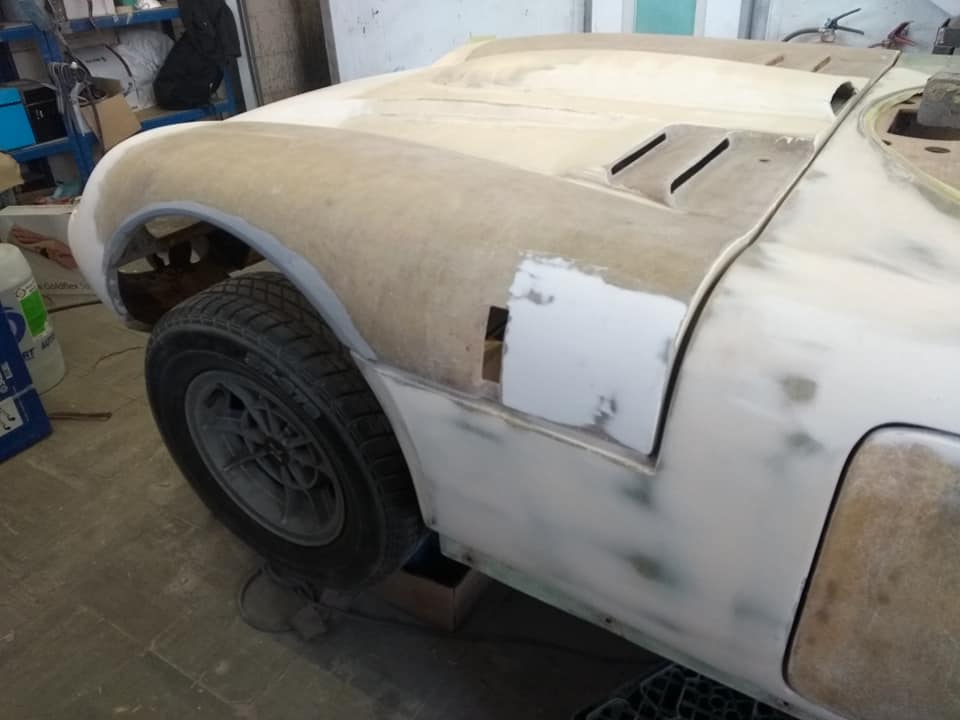
The panels were adjusted fitted, adjusted again and the story goes on, the Light wells at the front were in white primer at this point and one of the first things done by dad was to spray them satin black I know the rest of the car is a gleaming blue but there were practical reasons for being satin.

The front wheel arch fitments were the next thing to be done, now they look weird in the images thats because (And I kept saying this to dad, they don't look right!! they are too high) surely enough, I was proved right and subsequently they were adjusted to be correct. 


 At this point no interior was fitted at all, so some mechanical items started to be fitted, I forget which order it was done in now to be honest but from recollection Fuel tank was padded and slotted in, bushes for the shocks were replaced. (Yes, amazingly having not been road used the bushes had decayed!! the coil springs and dampers had been fitted back in 2014/15 so considerable time had passed which shocked me there did not expect to have to replace before driving it. 

The carburettor was applied to the engine with the base rubbers put in also and I also purchased the correct fuel hoses to be able to connect the already in place fuel lines to the engine. 


One of the major items burning up time on this resto was the heater unit, the original Smiths unit has somehow disappeared during the process of the rebuild, I cant remember if I have sent it away to be recoated or whether I actually sold it fully intending to get a much more efficient and powerful unit. As shown in the images i purchased a nice unit from demon tweeks this unit has a lot of outlets to cater for different areas of the car, the only issue apparent was that it needed raising from the original, its smaller than the original, but the old mountings that you can see in the dash had to be cut out we created a new plinth for it to go on and also had a part 3D Printed to go over the top of the unit and allow a similar outlet to before to be mounted up through the dashboard leather top. pipework was also routed through to the engine bay and Samco black hoses were used for this and properly jubilee clipped round the pipes. (Yes there's more Samco to come!!)  

Also at this time I started to sort out the Gauges some needed to be polished up and cleaned but largely these parts of the car were never too bad, all had a few hours of my time. at this point the steering column had also been installed, We had needed to make up the final column from to older ones as the main one was not in as good a condition as it should have been. During the testing it was found that some of the cabling needed replacing and this was also done, (Later it was found that the indicator stalk was faulty so we had to replace one of them again I think I bought two new ones to prevent any further messing around when installed. 

I then painted the steering unions and rods connecting everything up. 

The car then came hoe from Redline and one of the first things Dad and I did was to start installing the various bits of carpet wed had prepped by Nightingale Coach trimming there was a nice edging added to the edges of the carpets once they had been cut to templates there is quite a lot of commonality between this old Marcos and some of the newer types, Mantula, Mantara & LM models and Mantis the interior body shell areas they are fitted to are virtually the same its just the exterior shape thats changed. (Why change something that already works!)

As my dad had gained a great deal of experience over the summer fitting and refitting Mantis ineriors with around 2-3 done over summer 21 it was time for mine. the first issue was getting carpet to fit over the very front under the dash board and along the tunnel so a thin section was cut to bend the corners and cover all the ply wood fascia and the tunnel sound deadening. 


Once this section was completed Dad worked on the side curved panels and the footwell as shown in the next images, you really do have to ensure they are pulled tight and started correctly as you get gaps the rebate from along the sill to the back of the seat is trick as it all starts to overlap and fitting my leather seat backs at least was a bit of a faff to get fitted correct. there then followed a tonne of to-ing and fro-ing to get my seat backs and bases to fit right, the ply wood bases were machined both on back and sides to fit further into the seat well as I found with my height my head was right on the ceiling above me. 


The floor carpets have not been stuck down as it is intended that they can be taken out for cleaning, plus they have sound deadening material mounted to the reverse also. the tunnel leather fabric goes over the carpet but in image 3 the floor is over it. 

Also of note was the headlining Redline have trialled \(this car was the first to have it fitted) a new system for Marcos' whereby the headlining is a nice grey material that has sleeves folded and sewn into it to thread aluminium rods through so rather than glue the headlining to the roof of the car with a sponge back its connected to the roof through these adjustable rods. The advantages of this system over the old system is that 

1. After 10 years you don't have to rip it all out again and reinstall because the glue and the sponge have failed.

2 if the headlining drops on this system all you do is retighten without affecting the rest of the interior and having to take the glass out as the headlining and lots of the surrounding is all locked in place by window rubbers and leather trim.  (Photo update of this to follow) Since this system was employed, my dads V6 the yellow one had a headlining failure, (He was using the old 'glued to sponge and glued to the roof 'system, so the same new design adjustable rodding system was fitted to that car also. 


May 2021 The Repaint reveal

 Following my last post A lot has happened, (I'm writing retrospectively now as keeping up with the project at the time it was all happening was a challenge with tonnes of other commitments going on at the same time.

The previous post detailed the body prep and prime it took a great deal of time, a couple of weeks infact until I received the pictures I'd waited years to see and get to this point in of the project. 

Below are the images of the repaint, I cant really put it into words how awesome this looks after the event, some of my friends that had listened to me go on and on about this project since day one were blown away with the colour and the finish and the colour I had chosen here was Ferrari Le Mans blue code 516C


Pictures really do say a thousand words in this case, after 11 years of project at this point it was quite an emotional thing to see it in final colour, after years of selecting colours which I may have aluded to in one of my previous posts, there were up to 15 different colours on the table at one point, due to costs associated with spraying up test boards, I whittled it down to 2 very quickly!! Ferrari Tour De France Blue and Ferrari Le Mans Blue.

Le Mans Won it hands down in the end due to it having less silver speckles within it and therefore lending itself as a colour better to my much older car. already over 50 years old when at this point. 

Ill include another post after this one that will go over some of the fit out of the car. My dad has lent a lot of his time to Redline Sportscars to help with Marcos work, due to being quite knowledgeable with the cars and because of the sheer amount of work Redline have been getting in. 

25 April 2021

Priming work W/E 24th April 2021

 So, its getting petty exciting right now, as were are now at the point of the main body tub priming point, the main works have been done on the setup of the body and I've just received the latest images of the sheeting up protection of the car before priming took place, last I saw of the car, it was next to the spray booth with the body tub of the ex 'The Saint' Marcos famously driven by Roger Moore in one of the episodes which was a surprise as last I saw of it it was in storage at MHS.

So below are some of the photos of the priming stage. 


I can't believe how good it feels to get to this stage, It has been nearly 11 years since I bought the car and it seems like to get the bodywork sorted has been a painstaking time of both no activity, to the last 7 months where I've restarted everything again, thrown the kitchen sink at it and gone full steam ahead! 


The progress is looking great and I can't wait for the next set of pics over the next couple of weeks showing the final colour and the re-setting of the doors bonnet and bootlid before we press on with the internal and external fitments. 

Hope you enjoyed this mainly illustrative posting, I will be back with more updates very soon. 

Gazza


Final Prep and Priming! Its getting real now!

 Since my last update we've had an 'easing of restrictions' somewhat from the latest COVID Lockdowns which enabled me to book a day off and travel down to the region to see the car within the bodyshop before heading to my dads for a 'Garden lunch!' 


By this point, the car has had some modifications to the bootlid fastenings where Joe at redline has now enlarged the holes so that the mounting bracket can be adjusted in any direction and a nice shiny set of new bolts and washers have been put in to aid fastening, the boot still needed some upward adjustment so that the oval cut out for the fuel tank filler is round when both surfaces come together. 

The  car has also benefitted from filler layers to smooth out some more sections of the topside area where further remedial works have taken place. 

The bonnet although attached to the car is still having corrective works carried out to smooth out the roughness of the underside fibreglass to allow for a nicer painted finish which is in the long run much easier to clean incase of any fluid splashes of oil etc. 

The below photos show some of the late setup work and priming. 


Extra large image shows the guttering strips in situ for shut line adjustment. some good lines showing already. 


At this point there is still a rusty old headlight cover bracket in place which will be ground off and any holes refilled for mounting of brand new items. 

Bonnet is not fully down here for those who notice a large gap and change in height. 

 This was as of Thursday 15th April so the next photos show the final sheeting up and in to primer stage which I'll illustrate within a further post. 


Bodywork prep Ongoing.

Throughout February and March, the rubbing down and filling and continued fibreglass working has been carried out to prepare for the priming stage of the rebuild, there has been a lot of setup of the doors so that the shut lines are kept as close as possible, the passenger side hasn't been too bad, the drivers side was more complex to resolve where the roofline was ever so slightly higher, even though the actual frames were used to calculate the height for the roof to be bonded in to the main body tub way back in 2016/17.

The Bonnet in the shots has been put on with an exacting temporary plastic tube mounting so that the shut lines can be appropriately calibrated for when the car is primed. 

Below are some of the remaining Fibreglass preparation photos. 


This view shows the leading edge of the body tub, the edges used to be badly chipped and generally untidy, these have now been recrafted in fresh glass fibre and profiled. 

After the initial positioning of the doors and their window frames, the original Ally guttering strips which attach to the aperture just above the window frames, were taken over to the car and attached so that a further adjustment could be done to allow a reasonable amount of clearance between the frames and the strips themselves, these strips are quite rare as apparently the original type of material doesn't get made now however, that didn't stop me looking for some more! and I soon enough found two suppliers who hold stock of the type required and at varying different sizes. At this points the bodywork is starting to look very much improved in texture and is very smooth to the touch a testament to a lot of work that Ross at BARC has done. 

I'm starting to look into all the metal work that has to be drawn up to fit when I get the car back. stainless steel side skirts, Pedal boxes, battery tray coverings lots to fit back on, together with existing metalwork that needs to be repaired and re-plated.  

07 February 2021

Bodywork Prep Jan 2021

Firstly, Happy new year to you all. It has been a strange Christmas and New Year period with the lockdowns and the changes to plans.

Since the last post, the car has had a lot of remedial work carried out to the bodywork to complete items that were unfinished and correct a few fibreglass issues that were a little 'dinged' around the edges.

The main car, minus the bonnet has been shipped over to the Bodyshop courtesy of longtime friend Terry and has now had the majority of it rubbed right back, even the colouring on the roof has been taken back to the base.


Due to the current restrictions in travel and contact with others at this time, My comms with the bodyshop are mainly via phone or email so I've added pictures below of the current progress.


A few more pictures below showing some smaller areas of the car. 


Whilst this work has been going on, there have been further remedial works on the bonnet section, after taking back the filler layers on the bonnet it was found that there was a lot of cracking, fractures and areas of damage to the bonnet that have likely been caused by repairs to earlier accident damage, the bonnet is still with Redline at this time having holes filled on the underside where the Air filter has rubbed the bonnet bulge over time.


The areas where radial cracking was located are marked out on the bonnet in the black dots, these are being drilled out and filled with new glass fibre.

In addition to the repairs extra reinforcement has been added to the back edge of the bonnet to give strength to the rather thin sections currently in place. 

Dad has also repaired the mounting brackets on the closing panel that sites under the main dash panel this section houses the electric window switches. A number of these mounting points were rotten and have been replaced entirely. 


That's all for the time being, there will be more updates shortly as the body work is about to have the first filler coat added so I will add further pictures very shortly.