25 April 2021

Final Prep and Priming! Its getting real now!

 Since my last update we've had an 'easing of restrictions' somewhat from the latest COVID Lockdowns which enabled me to book a day off and travel down to the region to see the car within the bodyshop before heading to my dads for a 'Garden lunch!' 


By this point, the car has had some modifications to the bootlid fastenings where Joe at redline has now enlarged the holes so that the mounting bracket can be adjusted in any direction and a nice shiny set of new bolts and washers have been put in to aid fastening, the boot still needed some upward adjustment so that the oval cut out for the fuel tank filler is round when both surfaces come together. 

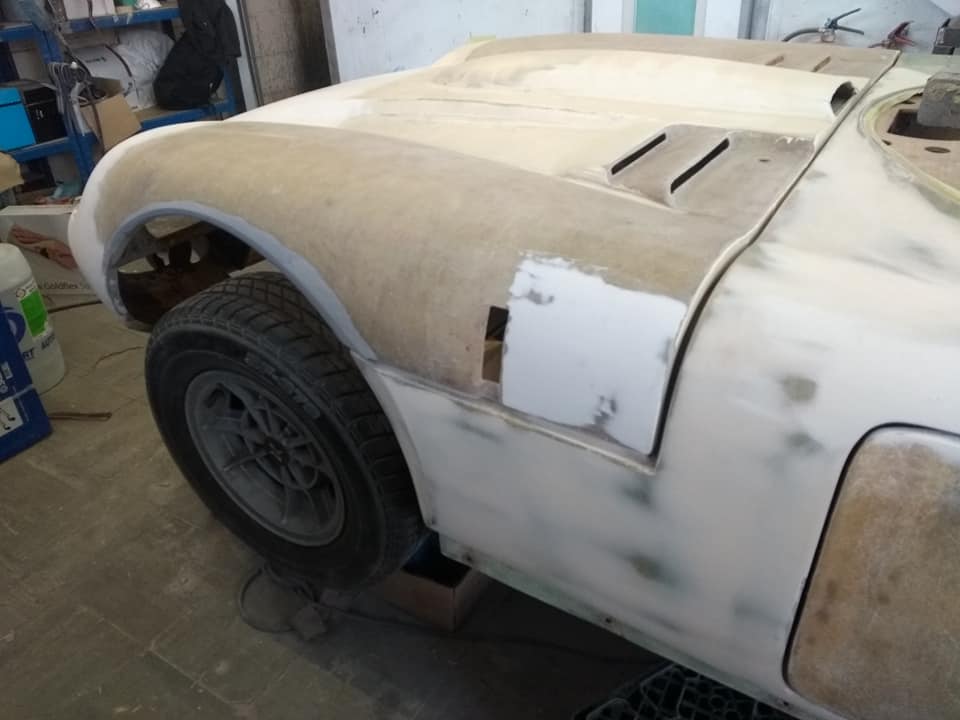
The  car has also benefitted from filler layers to smooth out some more sections of the topside area where further remedial works have taken place. 

The bonnet although attached to the car is still having corrective works carried out to smooth out the roughness of the underside fibreglass to allow for a nicer painted finish which is in the long run much easier to clean incase of any fluid splashes of oil etc. 

The below photos show some of the late setup work and priming. 


Extra large image shows the guttering strips in situ for shut line adjustment. some good lines showing already. 


At this point there is still a rusty old headlight cover bracket in place which will be ground off and any holes refilled for mounting of brand new items. 

Bonnet is not fully down here for those who notice a large gap and change in height. 

 This was as of Thursday 15th April so the next photos show the final sheeting up and in to primer stage which I'll illustrate within a further post. 


Bodywork prep Ongoing.

Throughout February and March, the rubbing down and filling and continued fibreglass working has been carried out to prepare for the priming stage of the rebuild, there has been a lot of setup of the doors so that the shut lines are kept as close as possible, the passenger side hasn't been too bad, the drivers side was more complex to resolve where the roofline was ever so slightly higher, even though the actual frames were used to calculate the height for the roof to be bonded in to the main body tub way back in 2016/17.

The Bonnet in the shots has been put on with an exacting temporary plastic tube mounting so that the shut lines can be appropriately calibrated for when the car is primed. 

Below are some of the remaining Fibreglass preparation photos. 


This view shows the leading edge of the body tub, the edges used to be badly chipped and generally untidy, these have now been recrafted in fresh glass fibre and profiled. 

After the initial positioning of the doors and their window frames, the original Ally guttering strips which attach to the aperture just above the window frames, were taken over to the car and attached so that a further adjustment could be done to allow a reasonable amount of clearance between the frames and the strips themselves, these strips are quite rare as apparently the original type of material doesn't get made now however, that didn't stop me looking for some more! and I soon enough found two suppliers who hold stock of the type required and at varying different sizes. At this points the bodywork is starting to look very much improved in texture and is very smooth to the touch a testament to a lot of work that Ross at BARC has done. 

I'm starting to look into all the metal work that has to be drawn up to fit when I get the car back. stainless steel side skirts, Pedal boxes, battery tray coverings lots to fit back on, together with existing metalwork that needs to be repaired and re-plated.  

07 February 2021

Bodywork Prep Jan 2021

Firstly, Happy new year to you all. It has been a strange Christmas and New Year period with the lockdowns and the changes to plans.

Since the last post, the car has had a lot of remedial work carried out to the bodywork to complete items that were unfinished and correct a few fibreglass issues that were a little 'dinged' around the edges.

The main car, minus the bonnet has been shipped over to the Bodyshop courtesy of longtime friend Terry and has now had the majority of it rubbed right back, even the colouring on the roof has been taken back to the base.


Due to the current restrictions in travel and contact with others at this time, My comms with the bodyshop are mainly via phone or email so I've added pictures below of the current progress.


A few more pictures below showing some smaller areas of the car. 


Whilst this work has been going on, there have been further remedial works on the bonnet section, after taking back the filler layers on the bonnet it was found that there was a lot of cracking, fractures and areas of damage to the bonnet that have likely been caused by repairs to earlier accident damage, the bonnet is still with Redline at this time having holes filled on the underside where the Air filter has rubbed the bonnet bulge over time.


The areas where radial cracking was located are marked out on the bonnet in the black dots, these are being drilled out and filled with new glass fibre.

In addition to the repairs extra reinforcement has been added to the back edge of the bonnet to give strength to the rather thin sections currently in place. 

Dad has also repaired the mounting brackets on the closing panel that sites under the main dash panel this section houses the electric window switches. A number of these mounting points were rotten and have been replaced entirely. 


That's all for the time being, there will be more updates shortly as the body work is about to have the first filler coat added so I will add further pictures very shortly. 


30 December 2020

2020 COVID19 Lockdown and work restarts!

So, It's 2020 and I realise it has been an eternity since I updated the blog, mainly due to a lack of work throughout the end of 2019 and the start of this year. 

What a year it has been this year (Mostly for some people a Year to forget). 

However, this year has brought some great things, a new job which has allowed me to really make a fresh start on this long overdue project (10 years and counting!). We had a lock down between April and July and I'd pretty much started lockdown on 18th March when we were all advised to work from home by our bosses. 

So, in the short window I had in July and August when restrictions were relaxed, I got a quote from Redline in relation to some finishing work that needed to be done on the Marcos bodytub. 

And so in late September on what turned out to be a horrendously cold wet and windy day we packed off the beast of burden to Redline for the car to await its turn in the works queue.


The wheelarches inside were unfinished and needed trimming back and smoothing off to make sure that they looked like 'one wheelarch' rather than 2. The arches on this car had been modified from the outset by the previous owner and due to being sculpted previously out of 6kilos of filler each side, needed to be taken back and re-done properly in fibreglass. 

once remoulded and bonded on there was more or less an internal lip within the arch, which has now been made good, as you will see from the next image. This is now ready for the anti-stone chip coating to be applied underside. 


In addition to this work there have been a lot of holes drilled in a 'Trial and error fashion' long before I owned the card and generally a lot of damage and chipped edges to things which needed sorting, Joe had also found a large amount of hidden damage under paint that needed to be corrected before paint  and so this was done also as part of the mandate of works. We have also templated the front edge of the arches as there is a huge gap that would allow water/dirt etc. to be thrown forward under the sills, so plates will be cut in stainless to blank these off. 

Also prior to the preparation and paint works, the car has had the rear and front screens trial fitted to ensure there are no problems when painting is done, the worst thing possible would be for us to try to fit and then either not, or severe damage occurring to the painted finish when fitting. (There is a new front screen being ordered which will be heated. 

other things of note are that due to the roof being made separately, you will recall from earlier posts that some bright spark had sawn the roof off to turn it into a spyder, not as this car should be. Marcos' were not made as Spyders in standard form until the advent of the Mantula Model in the early eighties. (1984 onwards) so I needed this car to be returned to how it was created in 1970 as a coupe. Digressing slightly there, the roof has a tendency to 'Sag' if sat without windows in so at the moment a pick axe handle is propping the roof up to shape it correctly to allow for the glass fitment, even though when re-attached in the first place, the door frames and glass were present for positioning and measurements for re-attachment. 


 It all looks a little strange at the present time, mainly due to the different colours and missing bits which I'm sure will allow it all to come together in the end. the whole car is going to need a thorough clean and all the accumulated dust really blasted out to be cleaned up. The glass looks a tad odd in places but with the front and rear screens Im told its pot luck with them as one screen may not fit another car the same as the one you are working on which is interesting - thus supporting the addage that no Marcos is the same as another. 


There is a great deal of correction work to be done on the door and pillar to the trailing edge of the door as the fitment has changed so this will be corrected so that it is absolutely right before paint. there is also so much new fibreglass that it will need baking for a short time before prep and filler work is done. 

Joe has also found a great deal of radial cracking on the bonnet which he is working on at the moment and will resume work on it once the New year starts and he reopens for business. 

Aside from the main body work, I have begun amassing a large amount of electronic and trimming parts mainly thermal foil backed sound deadening sheeting and all relays, cables and switches to complete the refurbishment of the dash board wiring and the front panel washer jets, my dad has stripped down and refurbished the windscreen wiper motor assemblies ready to reinstall and at the point of writing, I've ordered the new washer jets and piping to go back in. 


This is the main dashboard wiring loom which has had a great deal of bad cabling and connectors removed and new cabling inserted, with higher ampage capacity wiring were some had previously melted, also with the addition of the heated windscreen wiring relay, I've also had this set up for complete LED lighting and indicators so voltage stabilisers and an L.E.D flasher unit have been in stalled into this loom for me by my dad, who is vastly more experienced in electrics than I am! (He has built from scratch using drawings, his own entire wiring loom for the Marcos LM500 GT rebuild project that is going on alongside this rebuild) this saved thousands as he received quotes for astronomical amounts from several companies and so Dad decided to do it himself at a snip of the price.   


The only things left to do within the dash now are to refurbish the Gauges and get them placed back in to the front panel once re-instated after respray. The car has been totally rebuilt throughout, so I will probably zero the mileage gauge. 

The car is due to be taken over for prep prime and respray in the new year so hopefully a great deal of progress will be made with a view to getting this car on the road (Lockdown and COVID permitting) by the summer for some events, provided they also aren't cancelled!

Well thats about it from me for a couple of weeks, until we get some further progress updates, I will post here and on my instagram thread too.  

Hope you have all had a merry Christmas and here's to a happy new Year. ;) G.


07 November 2019

Interior tub work.12-10-2019

Having been a few months since I did any work on the car, I managed to get to the Garage with dad this weekend to do some more interior tub preparation for when we install all the new heat matting/sound insulation to the interior of the car.

When the old interior carpets and matting were stripped out, the fibres from the old material remained glued to the tub so to make sure it doesn't affect the new install, we have started to remove the old stuff from the tub. I began by using a Dewalt drill with a wire brush tool fitted in order to scrub the easiest of the fibres off. 

The transmission tunnel had the same treatment, although I quickly found that a chisel used lightly on this part was very successful in removing the clumps of fibre material. 


Dad and myself both spent some time on this part, as well as dealing with the matting in the gearbox area where we glued this up so that the hole for the Gear stick wasn't impeded in any way. The weather wasn't great, so we covered the dash and the engine up for this process. 

Before too long goes by, I want to get the car back to my fibreglass specialist in order to get the doors and some body work and the bonnet dealt with so that it is effectively ready for prime and respray. Once these elements are done it's the rounding of a major corner in the rebuild as everything else should then be a basic fit-out job, with most of the parts needed already refurbed or needing to be purchased in a small number of cases. the major bits on the to do list are still as follows:


  • Re-chroming of the brightworks
  • new Exhausts and ceramic coating of Manifolds
  • new radiator
  • battery and connections
  • hoses and connections as well as fuel pump and pressure regulator to setup the fuel system
  • new dashboard switches 
  • new steering when and steering column refurb. 
  Hopefully have another update for you all in a couple of months. 

30 July 2019

Continuation of Bodywork prep. 2019

Hi All,

It has been a while since I've been able to post, so apologies to those who were awaiting another update!  (Pictures will follow as I'm posting opportunistically from another location).

So where were we? well, we had begun by removing all the red paint from the main tub, the doors and the bonnet and boot lid. this has continued and we have removed further paint from the rear quarter on the drivers side using the heat gun gently in all these areas, there was a lot of paint in some areas as opposed to others with bits of filler for where there has been historic damage or fills to any imperfections on the bodywork, again, this has been quite a slow process and we have been down at the garage for a few hours at a time sorting these issues out. I've had some issues getting down to do work on the car recently due to a large volume of commitments both in and outside of work and with funds being restricted to save for the respray which is the major element of what I have left to do here, I've been doing work or got assistance from Dad and friend Terry with other jobs that don't cost too much.

Following some additional paint stripping jobs, we have also been working underneath the car and have completed the rub down, de-grease and repairs to the underside, dad and Terry also totally sprayed the underside of the car with the Anti Stone chip and under-seal resins so that if I drive anywhere I wont get stones damaging the underside.


Following the resin coats, the heat resistant matting has been adhered to the front bulkhead in the engine bay area, the footwell areas within the engine bay and the transmission tunnel (pictures also to follow) these were adhered securely to the panels and have been finished off very nicely indeed, I have also received a delivery of additional powder coated parts that I sent away to be treated and coated so those will join the inventory of bits to be re-fitted to the car when i reach that point.

Dad has also been going through my wiring loom (rather him than me!) and has replaced and upgraded several reams of cable that were either damaged previously whilst in the car, or have been upgraded to cabling that is more 'man enough' for the job, as we found the speedometer cable had begun to melt, so best to go through and upgrade things, avoiding electrical fires and unreliability is key at this stage, Dad has also set about upgrading the types of connectors for joining the front lighting loom the main engine bay loom so that a good quality connection is in place and ensures reliability.

The car has been a rolling chassis now for a few years and we've noticed that some items that have rubber bushes have degraded whilst installed so some parts that haven't even seen the road are needed replacement which is a worry as I don't want to have to go back through renewing everything before we have even moved onto a road! I had intended to have gotten the car on the road by now, but as we all know, life gets in the way with unexpected situations.

Meanwhile in the last month or so, we've returned from a wonderful trip to Luxembourg, as usual impeccably well organised by Paul, Dan and the rest of the Luxembourg team, with additional input from the Swiss Marcos Club. We had a great time touring using dad's Yellow V6 Marcos which for the first time on a Luxembourg Rally, behaved itself and drove like a dream on the continent. I had also not driven on the continent before so I remedied this and started to get used to driving on the 'wrong side of the road!' we did have a solenoid issue the afternoon before we went so thankfully we fixed this before we set out and too far from our own supply of parts, again, there will be more pictures to follow of this great event and soon we hope to begin a blog on the LM500 rebuild, a project that we managed to procure in July 2014 and have so far re-registered, built up a new chassis, rebuilt fully the 5.0 Litre NCK upgraded Rover V8 engine and assembled all the parts required to bolt onto the chassis once treated and reunited with the bodywork the car should be fully rolling within a couple of months.

More from me soon.
Gazza