30 April 2017

Working Update April 2017.

Hello! A huge apology first of all for not updating this page as much as I should be, my new years resolution is to do more to this blog this year as I push to get this car more or less complete. As the costs of respray are still being worked on, Im working around all sorts of other jobs with my dad so that once the respray is done therell be just the formality of fitting everything back in. 2016 was full of house decorating, aircraft events to raise funds for the Nimrod Preservation Group I'm part of and generally things being manic at work.

So, when I last posted, we still had the car at the fibreglassers, the engine and Gear box were all being overhauled and repainted with the relevant materials and parts were going off to be powdercoated.

Since the last post around July/August 2016 the main shell of the car was largely completed from the long fibreglass repair process (This had to be right so I wasnt that worried that it took so long to do) Andy @ Westgate Creations has properly sorted out the car and has even made improvements to the structure strengthening in places that are susceptible to stress cracking, this will mean replacing the body back onto the chassis will be a lot less stressful in many ways.
Car was collected in August 2016 and brought home, whereupon we set about carefully sanding off the old paint, this will mean that the body shop doesn't charge me masses for this long laborius job the less we leave for them to do im sure this will help the spray bill!!! I can recommend taking time on this, being as careful as possible and dont stay in one area for too long as you will flatten an area thankfully weve been careful and weve maintained the curves.

below are some pictures of the sand down work we have carried out on the bootlid and the doors, we still have the bonnet to do and some areas of the body tub (Although so much old paint has been taken off already from the tub during the repair process there really isnt that much paint left to take away). I'm not going with red on the respray (as I mention to everyone over and over again!) im looking for a lovely dark blue, there are plenty of old Red, Orange and Yellow Marcos out there already!

My Friend Bob's Wood chassis 1600 Marcos (Left)  Next to mine (Right) in the workshop before the fibreglassing on mine was done

another shot from inside.


view of my Cars Home coming on the trailer note the extensive wheel arch repair.

Front quarter view showing under front bonnet repairs to remove the stress cracking and flashing from old 70's 'Snowplough' spoilers

Another side shot showing exactly the same wheel arch repairs to the right side.


Rear view when the car was at the works showing the new arches in place.
As i mentioned before and to update this time round, the car had modified arches as it was the previous owners intention to run a wider axle, but this mod was never completed and as I wanted the nice 3.09 ratio axle and already had a wide one with the Marcos brackets already mounted I fixed that on once overhauled and then got the fibreglasser to modify the arches to how the car was set up this way the typical problem of the wheels being set too far forward or back in the arch was overcome. the original modification was bodged by someone else making the arch 100% out of filler!!! 6kg's of the stuff was cut out of the sides of the car (Each side) which removes a bit of nasty unnecessary extra weight, and also means that the cracks where the filler was starting to part company with the rest of tub were removed my fibreglasser then set to with creating and setting up new moulds as he had a number of wheelarch configurations that would suit. problem with a Marcos is the part between trailing edge of the drivers door and the rear arch is a different distance on each side (Shorter on the drivers side) so subtle changes had to be made to sculpt these in. (Im told the Body tubs were made in two halves and  each half was made by two people who werent speaking to each other at the time!!!! Helpful!! :/

So, now back home the car has been sanded down (Doors and bootlid) with the fun of the bonnet to come, so I think a trip to screwfix to acquire some tressle stands to evenly prop the body on them flat whilst sanding is coming up shortly. Ive put some pictures below of the door sanding process, it took a while to bed into the 47 year old paint and start to take it off you can really see that the car used to be yellow at one point or other!! Pictured next to dads Marcos. A word of warning to the uninitiated, please do cover up when doing this! Masks, goggles etc. as this stuff gets everywhere and the mixture of fibreglass and old paint dust is probably pretty nasty it gets everywhere too so my chassis is going to have to be air blasted clean with a compressor now.


The flat sections arent too bad as these will take less time but the curved bits a bit of a challenge!! not for the faint hearted but it saves the bodyshop time and effort and saves you money! There are still some repairs and strengthening work to be done on the doors, as the area the hinge and the check strap goes through needs some metal glassed into it to beef it up, thisll mean when the door continually is opened and closed over time that the cracking doesnt occurr from stress. I have to get a new aluminium or stainless steel thin plate made to the rear of the interior door panel for the handles to bolt to as the old one is not serviceable and I might as well do it now whilst in bits.

The bootlid is also now done, there is a low spot where there is yellow paint still left but im pretty sure we arent going to get this off in a hurry so will leave as it can be 2 Pack primed over and then covered.

Other work that has been acheived so far, are the engine jobs, now at the point of writing the last blog, the heads were about to go away, these came back having been machined and having new valve seats added for Unleaded fuels, the head blocks were then painted with a nice black satin enamel paint to go back onto the car. we then made sure all the other items such as crank and cam shafts were in good order, the push rods were all good and the timing wheel was changed. there were numerous bearings that we replaced and I also invested in a full set of Stainless steel rebuild bolts (Allen headed ones) got those from Retro bolts UK they are on Ebay and they are well worth buying as they look awesome! so we replaced all the original bolts with those. Also to note, we installed a Steel timing gear wheel, normally  Essex V6's are fitted with either a composite wheel with fibre teeth, or a totally fibre one the problem with these wheels (Which is fairly well documented)  is their tendancy to shred themselves to pieces when Oil temperatures are low and revs are high so under those wheels, its recommended that you dont push the engine until it and the oil have reached an acceptable temp. however, these new wheels also having a side effect of being slightly noisier when running, they are infinitely stronger and wont damage your engine from being shredded! The engine being used is the spare as my original needs so much machining its currently cost prohibitive and will seriously dent the budget. (I had a quote from Burton power of nearly £10,000 to do the whole thing!!!)

here are some visuals of the engine work taken over the last year with footnotes.

Steel timing wheel and now chrom powdercoated timing cover back seal plate
Proper Gear box gaitor in place instead of the cut off section of duckhams oil container that someone had placed there before!
A collection of all the shiny refurbished parts and the shiny bits I had acquired. I invested in two spare sets of Red rocker covers as our green ones from this engine were screwed! so we shotblast and powdercoated my original ones to chrome as well as the timing cover and the back plates and the other parts such as pulley wheels and the sump were black powdercoated. the results are gorgeous!! Thoroughly recommend my Heros Redditch shotblast for any powdercoating you want done, its absolutely first class and really tough wearing too.


The Chrome Powdercoating is not only beautiful to see, it is also not going to bankrupt you like chrome electroplating eventually will! There are parts yes, that I have to be sent away to be chromium plated such as the door frames as these are a shiny external piece that has to be bling! Its however far you want to take it, eventually I may chrome various bits bit by bit.

I bought a new inlet manifold as although we have 4 of them, they are all slightly different, and all come with their various idiosynchrases so I grabbed a bargain on ebay and the new shiny bit of awesome turned up shortly afterwards now installed on the engine in yet again, an earlier picture taken late last year.

Chrome Rockers placed on the engine before the Inlet manifold was purchased.

Stainless Steel bolts put in place to show detail Oil pump just coming into view at the bottom right of the picture.
Rockers, Inlet manifold, refurbished Distributor, pulleys, water pump all in place.
I have also started restoring old parts that I no longer require as these are useful for generating some much needed cash to buy the things I am missing from the car, for example, a rad, which I am getting quoted up for a brand new ally construction ally cored one, have initially tapped up Coolex Radiators for that so I shall see what happens other items include the red top Facet fuel pump, Walnut dashboard, steering wheel boss and wheel horn etc.

At the point of writing we have now put the engine back together fully and are about to do a flush out of both the water system and the oil sytem to ensure there is no swarf, dirt or otherwise within this engine. A picture of the virtually complete configuration will follow shortly. I have just returned from Stoneleigh classic and kit car show so have added a few more bits to my inventory, namely a new thermostat housing which is lovely and powdercoated silver just like the rest of the engine. I also bought the catches for the check straps for the doors and now need to source a nice checkstrap in the same colour leather as my interior. I will be following up this post very shortly with more pictures of further work as and when it is done.

I'll leave you this time with a picture or two of our latest gathering at Stoneleigh Classics show. See you all next time.


28 March 2016

Easter Bank Holiday Working.

Another great weekends work which began with a lovely day on Good Friday.....good sunshine which meant we could potter around in and around the Garage.

The first items on the list to sort out were the various plates for the engine and gearbox mounting areas, and the sumps for both the reserve and original engines. The reserve engine is going to be used for the moment to put my car back on the road as the budget i have is to finish the car and not to rebuild the original at this current time so that one has been coated in protective oil and wrapped.

We then started by painting the reserve block in a satin black still gives it some shine but its the part of the engine that isn't going to be seen much anyway I'll go more for colouring on the proper engine once it has been rebuilt as I'll most likely specify a ford blue for the block during/after rebuild.


The block is now painted in its first coat of satin enamel paint and since this set of pictures were taken, the engine has had the current timing wheel taken off and the front plate removed also, so we were able to get in and finish the paint up on the front too. Our next job with this engine will be to get the heads machined for unleaded and cleaned with new valve guides installed also. Into view on the right is dads V6 Marcos which we also swapped the old solenoid out for a brand new one, for a long period of time now it has suffered with niggly starting from cold and restarting after use Id often go to fill up at a petrol station and embarrassingly it would fail to start again so this is another electrical item we have sorted only thing next to do is swap her over to electric ignition which it still doesnt have we also have an oil change and sump plug repair/replacement to do as currently a larger than average volume of oil is seeping out and onto the floor which is requiring a great deal of cement powder to soak up.


Anyway, moving on, I have turned my attention to getting the gearbox sorted so the main body of it has a section that is more prone to rust than the rest of it so I have decided to give that a nice glossy coat of Hammerite to protect and make it look great for the re-installation when eventually that part happens it all depends on how much longer the bodywork repair takes.

Below picture shows the paintwork (Black) that has been done, the remaining silver areas will be thoroughly cleaned through and remaining dust removed.


There is also a large gear shift knob that we have to modify also, it originally had a standard gear knob with a cable coming out of the gearbox for the overdrive, we have decided to buy a triumph Gear knob that has the overdrive selector on the knob itself to avoid having to put your fingers elsewhere during driving this means a hole will need to be drilled down through the top of the gear stalk and a further hole drilled diagonally to let the cable in to go up to the switch. it will also make for a tidier appearance.

In addition we have a series of plates to go around the engine and the gearbox mounting area these are all a bit grubby and are going to be re-powder coated to ensure that everything is loooking new for re-assembly all in the aid of working through the to do list while the car is away so that we can just fit everything together when it returns I'll degrease those next weekend.


Well, that's about it for this weekend more next time! ;) Thanks for reading.


22 March 2016

Work 2015-March 2016

Hello all!
Apologies it has been a verrrrrry long time since I posted, not a great deal to talk about except that the Marcos is still away with the fibreglasser being worked on (It has to be right so there's no rush there! coupled with a House renovation project also (Im a glutton for punishment) I've had my hands full.

I have managed to have some fun at times too, most recently having an educational test drive in Tesla's latest offering the Model S P90D arranged through Tesla of Birmingham, what an experience! 0-60 in 2.6 secs coupled with Auto pilot and auto parking I was truly amazed by the wealth of features onboard, it took a while to sink in that the car I was driving costs nearly £120,000!!!


So towards the Tail end of last year my roof was fully bonded to the rest of the bodywork all of the glazing and dorrs were used in the process to get the height right and a series of formers were used to get the locations right, The good news here is that anyone who has the same problem can either use the moulds I have for this, or arrange for a copy of them to be made and sent.

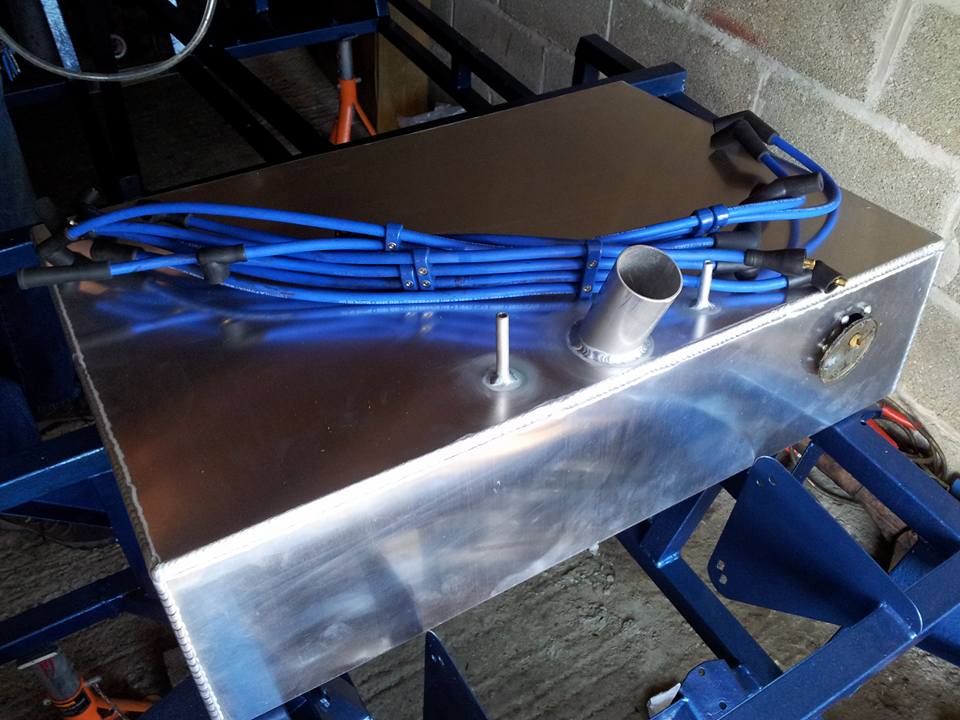
Also since the end of last year I collected my brand new Aluminium fuel tank which looks wonderful! and is a hell of a lot lighter too!

The Fibreglass work as I say is ongoing, and with the Easter weekend approaching I plan on getting a fair bit done, so we plan to do some electrical work on dads V6 and also to final degrease and start repainting the Reserve Essex V6 engine we have on a work stand in the Garage, so gradually we shall get it looking gorgeous again. We will be doing this one black and it will have chrome rocker covers and front timing cover too. I am yet to have the heads sent away but that will occur over the next couple of weeks. The engine block and area where the rocker gasket will go has been smoothed down with a wire brush attachment on our power drill so it is flake and dirt free now. (She is looking very dusty at the moment so I warn you all it doesnt look pretty quite yet!!


Bit of a rapid blog to write  but figured I need to get SOME info out there for those who are following.

Some pictures are pasted below for explanation of work and to get an idea of the bits in progress.


Big thanks to Alan from my local area meet the Midlands Marcos Meet who kindly donated a brand spanking new set of Magnecor style Spark plug leads to me after selling his wonderful Mantaray V8 to pursue his interest in Mercedes SL's. These leads are V8 ones but all I have to do is take the extra couple of leads out, no biggie.
The old blue chassis is still for sale and is advertised on both Pistonheads.com through the CMI Club Magazine and on the MarcosSportscarenthusiasts page too. anyone requiring a ready made, ready restored solution to a refurbishment job they have taken on is welcome to contact me to discuss.

The Marcos is currently having its rear arches worked on as we found that the current ones are not made of any fibreglass ones at all its a load of carefully sculpted 'Filler'  so moulds have been taken and the new fit ones are being added at this time.

The good news also is that my car has a new Marcos Stablemate there! a friend through the Club has elected to have his Marcos fibreglass work carried out there too, this particular example is a wood chassis 1600 type so a bit earlier vintage to mine and has the shorter 'non power bulged' bonnet

left the 1600 Marcos and right mine, note the new Arch guide moulds in place.

17 May 2015

Charging onwards!! Body work etc April-May 2015

Hi Folks!
Its been a few weeks and a mental few weeks too! with ongoing work on the Marcos together with my volunteer work on Shackleton WR963 a lot has been done over the last two months. When I left you all before, I was working on the engine strip down.
The engine was taken apart piece by piece starting with the Heads, all the parts were stored in number order push rods etc put through numbered pieces of cardboard so that they go back in exactly the same place they were before. everything looked great! until of course we got to to the crank and bearings.....most of the bearings were fine, a quarter of them though were quite heavily scored and the crank apparently has so much wear on it that it will need a full re-grind all the bearing shells need replacing and also to my dismay was the bores on the engine itself, these were a different measurement from the top down to the bottom so unfortunately a re-bore HAS to be done so I'll most likely go to just under 3.1 as advised by a contact who has been speaking to Ric Wood (Manufacturer of race spec Essex V6 engines. So thatll be in the memory bank for sometime until I rebuild my engine. At this time we have a spare Essex unit that for cost purposes we will use in mine until such times my original engine is rebuilt as this will cost around a £1000 to sort out fully.

I just want to get the car out on the road so Ill earn the rebuild cost with some extra overtime.

So below are some of the strip down pics of my engine. only limited im afraid as the phone I took them on had a melt down this week and lost half the camera folder!!! grrrr! stupid thing not buying a samsung phone again!


Shortly after this was done the Marcos Chassis was taken over to the Fibreglassers to be reunited with the body tub after we had completed the build up of the chassis.
Significant work had already been done with the body as well as a totally new roof as the old one was quite frankly......knackered!!! Rory at M.H.S invoiced around 300-360? for a new one? he is the only person who can provide one as he has the moulds for them all. so the roof as per previous posts was a top with 4 posts to enable a better fitment to the body (And itll take less time for Andy my fibreglasser to put in place than re-hashing the old one!)

Below are some of the placement pics of the roof before the fitting work was carried out.


As you can see, the bootlid had a significant amount of remedial work done to it too to make it stronger and have a smoother non-crazed finish.

Looking a little bit like a patchwork quilt the marcos has a number of other jobs to be done on it, not least a great deal of remedial work to the front end, the wiper motor cut outs in the front just forward of the front screen had bbeen made larger by years of use and movement these have been shored up and strengthened, together with the make up of a new dash console top the piece that the leather top cover then fits over.
below are some more pictures of this work carried out too.

 This is the old dash top cover as you can see in a number of pieces and fairly rotten the whole top has been recreated in ply as per the below image......
Brand new ply Dash top cover, note the cut outs in the body tub for the new roof pillars included within the new roof mould we had done. 
From this point the new Dash top was installed into the car.


As you can see from the insulation covered gear box tunnel, there is still a lot of fiber glass damage visible and this is also on the list of 'must fixes'


Huge amounts of work have gone into this bit as the seat base rear kept fouling the chassis so a decision to modify this was made to ensure that when unscrewed completely you can remove the chassis with far more ease than currently possible far from the current crow barring and jacking of old! please note the cut outs near the pillar points around the edge of the front screen area this is where the new roof inserts go in.

The Gear box tunnel has been reglassed including repair to the retro ash tray fitting hole. Ill keep this in but no smoking in this car!!

The seat belt mounts now all come through the tub and have been glassed around the bases im told that the floor is now strong enough to stand up on! you currently can with no roof!

I now move to the bit that is massively important on the car.....the roof bond in! This car hasnt had a roof in place for a couple of decades i think, the chop off caused a bit of consternation in the club from what I heard, so this is now remedied please see the below pics emailed to me short time ago that show the re-bond.


Wit the work that has been so far, the car is at last looking far more solid than she was I can rest easy knowing that the car has been fully sorted from top to bottom.

well. at this point it was necessary to clean out the garage that the car hasnt been in for the last two and a half months so we swept out and arranged a lot of things so that we can get the car in at some stage soon. the old chassis that I intend to sell is currently sat in place of the rebuilt marcos  being degreased and prepped for a new coat of paint. This Chassis has been modified to accept the latest strengthening mods, a rebuilt front end with additional bracketry and although 45 years old has been fully approved by M.H.S (as they found out during welding) it is packed solid with waxoyl hence why it hasnt rusted and is in such good condition.


So the main jobs we will be doing over the coming weeks will be painting this (at the point of writing we have painted the front third already and also mechanically prepping yellow V6: TTU 11J for its trip to Luxembourg for their fantastic rally pictures to follow. See ya next time!

08 April 2015

Engine Strip Down March/April 2015

So now that the body work has been taken to the fibreglassers for work, It was time to move on to the next big job, this is to strip the engine down.
The main ancillaries have already been removed together with the timing cover and inlet manifold. we have exposed the timing wheel also during the previous work and found that it was the worst kind of wheel you could have found, the fibre one that has a tendancy to shred itself and ruin the engine at high revs and low pressure.
Engine front with Fibre timing wheel.
A replacement steel timing wheel has been sourced and we plan to install this once the newly refurbished and shiny engine parts return from being treated. (see below Steel timing wheel) these are a bit noisier than the original when run, but are worth the inconvenience as they will last a hell of a lot longer! A friend of mine bought a couple of V6 Essex engines and each of them had these wheels in so that was a bonus we arranged a trade of parts.


I intend to acid dip the main block and other components to ensure that the old paint and dirt comes off to reveal a nice smooth clean finish.
Several other bits will be sent away for powdercoating/chroming etc..cue my favourite shotblasters and powdercoaters over in Redditch. :)

Below I have included some more pictures of the work, The first picture shows the Heads taken off following closely the order of the bolts according to the Ford Capri Haynes Manuals we have.

Heads removed

Block shown minus the first Head
Looking at the block as it is here, you can tell by the orange on the block where the oxidised water has been, but no worry these waterways will be thoroughly cleared when acid dipping and cleaning commences. new core plugs must be bought as my dad has informed me after the strip down that these are as thin as tin foil now.


Another thing to note while doing this (as we found out twice already) Don't tip the engine up at this stage!! oil if left in the sump will find its way out everywhere!!

Since these stages of the engine strip down tyhe Chassis has been completed with all brake lines being finished off and connected rear wiring harness has been refurbed and put into place through its run down the gearbox tunnel.

28 March 2015

Working January-March 2015

Hello All!

Jem Marsh 1930 -2015

 Firstly It is with great sadness that I write to inform you all of the passing of Jem Marsh, founder of Marcos Cars. My thoughts are with his family and friends. Jem leaves us with a lasting legacy in the shape of the beautiful cars a few of us like myself are lucky to own. These cars have brought so many of us together and the Marcos family is both large and a strong one. Long may it continue.

Another overdue update, again work and additional commitments have been manic! but have recently been able to make major progress.
Since the last post I have with my father installed the clutch and brake lines and started on the fuel lines together with the rear axle rebuild and install. The Chassis is now completed so this means I can move on to the engine and the bodywork.

So first up is one of the images of the rear axle build up, using all the powdercoated original parts installation of a new brake compensator and cabling was put on the axle the old compensator was worn through so best to get a new one.


The front wishbone and shocks and hub assemblies now built up and installed onto the chassis my apologies for not showing the complete process, but with the backup of my phone pics not being where I left them I cannot locate the previous images!!The Track rod ends shown in silver were starting to corrode having been installed on the car for some time now so these have now been painted in silver hammerite as well as the top ball joints also made from the same material.

I'll update you all with where we are now, the chassis is now fully completed, and on the four original Marcos Alloys previously used on my dads Marcos before he changed them to Minilites.

At the middle of February the Bodywork was (rather amusingly) packed into a white sprinter van and driven to the fibreglass specialist there are quite a lot structural cracks in and surface defects also so these are being cut out at the moment and re-glassed and profiled all of you other Marcos Restorers I'll provide details on who is doing the work once the work is completed.

Amazingly all this fitted in! also took the old axle and an additional set of parts at the same time.to be refurbed in the Garage.

Currently the first items to be repaired on the body is the boot the structural elements where the boot hinges attach to were cracked and not very solid either so these have been reconstructed with new glass and reinforcement. there was a crack along the rear of the boot that has now been cut out and rebuilt also, the metal lock mechanism was loose and not held on by much so this was reconstructed to fit better and be stronger. some pictures below showing the work done.


These shots above show the major boot repair work and re-profiling done to tidy up what I feel was horrendous before! the bonnet work is due to nstart next for which I have provided the new Marine Ply inserts that allow the bonnet to mount to the chassis A-Frames. 

In addition, the cut off roof I had was deemed to be too far gone to repair, the webasto sun roof was a bit heath robinson in how it was installed to this car and was too large also, so I will attempt to source a replacement unit to use on the car.
In the meantime, I have purchased a brand new roof moulded by Marcos Heritage spares from the original patterns and moulds. this will be reinstated to the car in the fibreglass workshop which I hope to take over with the chassis next week so I will have a lot of space to work on the engine and the clean down and repaint work on the old chassis that I had modernised and strengthened, repaired where necessary. You may all recall what the main body looked like minus its roof:


Picture below shows the new roof (Green gel coated)

In addition after ordering the roof I requested the pillars to be added too for a better stronger installation this should in turn cut down the amount of time the fibreglasser will need to spend repairing and re-bonding the roof.

Following these events, The Chassis has now been completed we put all the wheels on 2 weeks ago and Dad when I havent been able to make it has been working to finish off a few chassis bits for me and has secured and installed all the wiringand final break pipes and hoses. the pictures below show the completed chassis finally rolling again for the first time in 3 nearly years.

Here are a selection of pics showing the work up to the minute.

For securing the fuel line and the rear wiring harness I've used Aston Martin supplied tie wraps that have their own mounting stub we drilled a slightly smaller hole so that the stub fits in nice and snug and won't come out again is the most important bit! the fuel pipe has been cut from a length of 8mm Diameter Zinc copper pipe and will meet a section of steel braided hosing up front into the pressure regulator.
The rear brake hoses have now all been connected we may need to shorten the front ones around the wishbones and the pedal box as we over estimated slightly, but, better too much than not enough!

Well, that's all for the potted three months blog, I'll try and be more proactive and update as I go along next time as larger stuff happens from here almost the home straight!!

Ciao for now!


30 December 2014

Winter working. 12-2014

Hi Peeps! It's been a while again but im hopefully back to post more regularly now as we approach the business end of the rebuild, I've just moved house and have been in and out of broadband availability.

Well, since my last post attention has been paid to the braking and clutch hydraulic systems, together with the engine disassembly.

A significant amount of copper piping was purchased and this has been flared using a brake flaring kit.
The copper piping has been channelled through the Gearbox tunnel to the front of the car whilst two large runs of piping have been used along the length of the rear axle and joined at various points by swaged and plastic coated aeroquip hosing.
A new Brake compensator was added to the axle bracket and brake slave cylinders (New) were purchased to install within the rear hubs. Still to refurbish is the metal adjuster bar that runs along the axle to the compensator also.

First piping run to the Brake switch
I have also begun dismantling the engine, starting with removing the starter motor, the engine mountings that were still attached to the block, the distributor, the carburettor etc. at this time the rockers, the timing cover and the inlet manifold are all that are in place on the block Looking at the rockers under the covers these appear to be in brilliant condition, showing the cars low mileage and potential engine rebuild that may have occurred whilst the last modifications were being done to the car.

So far the brake lines are now in place, together with the clutch lines in, I have with my father begun measuring out the fuel line piping to also be mounted through the gearbox tunnel in the chassis.

I will upload the pictures shortly, however in the absense of the direct connecting cable from the laptop to the phone, the email isnt coming through with the pictures on. (Typical!).

More updates shortly.